
Wood Engraving: Four Tips for Success
Laser cutters and engravers are very versatile tools that can add a large amount of variety to your creative projects. When it comes to the materials that you will use in your laser system, wood is going to be one of the most common materials. The reasons wood engraving is so common are simple: it is a very versatile material that you can utilize for both cutting and engraving, and it is one of the easiest materials that you will be able to find both online and in stores.
Since wood engraving and cutting will likely be one of the most common things you do with your laser, below is a list of four tips that you can use to help get the best results possible out of your laser. This list will mostly apply to the CO2 laser cutters and engravers, since they are among the most common types of lasers available for consumer, and they are the best suited for working with organic materials such as wood.
Wood Engraving Tip #1: Choose Wisely

Before you even get to your CO2 laser cutter and engraver for wood engraving, you should first make sure that you examine your materials carefully before you make a purchase. While it is understandable that you may purchase most of your materials online, you will likely have the availability to go to your local hardware store (such as Home Depot or Lowe’s) to make your purchase. If you have the option available, go to the store and check it out before you purchase.
There are a few things you’ll want to keep an eye out for when purchasing your wood:
- Grain: Make sure the wood grain will be suitable for your needs. If you are engraving something like a photo that will have a variety of gradients, wood that has inconsistently colored grain will interfere with the results. If portions of the wood grain are softer than others, your depth will not be consistent, and those different colors may make details and portions of the picture not as visible as other portions. Knots will also be another thing to look out for since their density is slightly different and will change the outcome. Sometimes these knots are filled with putty and fillers that will not engrave very well, and can lead to inconsistent results.
- Warping: This is going to be the biggest challenge you will face when purchasing materials for wood engraving, especially if you have a larger laser system like the P-Series 48x36, or the Muse Titan, both of which allow you to fit larger materials into your workspace. If your wood is warped, it won’t sit level inside your machine which means that your focal point will vary. This will affect both wood engraving and cutting.

Plywood Glue: Plywood will always be a little bit of a gamble, especially when you are cutting it with your laser system. The glue that is used to hold the layers together may be more abundant in some areas of the plank of plywood versus other areas, and the laser will not cut through those portions as easily. This is hard to tell when first examining the wood, but make note of which types of plywood have this issue and where you purchase them from, that way you can avoid that same wood in the future, or make note for specific settings.
- Layers: Different types of plywood have layers that vary in consistency and hardness. When you are selecting your plywood, examine the edge to see what types of layers it has. You’ll notice that some plywood uses a series of thin layers of the same material, where others may use surface layers of wood and central layers of a filler like fiber or sawdust. This can make a huge difference when you are cutting and engraving, so you want to find sheets of plywood that have the most consistent layering possible, and try to avoid the plywood sheets that utilize a fiber or sawdust material for the inner layers.
Wood Engraving Tip #2: Materials Test
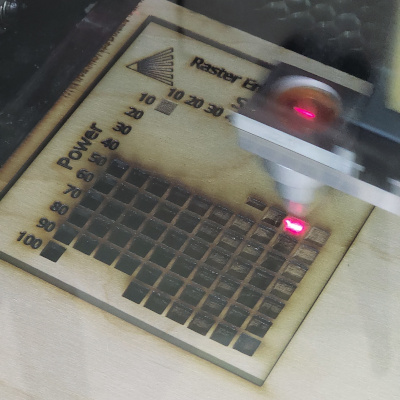
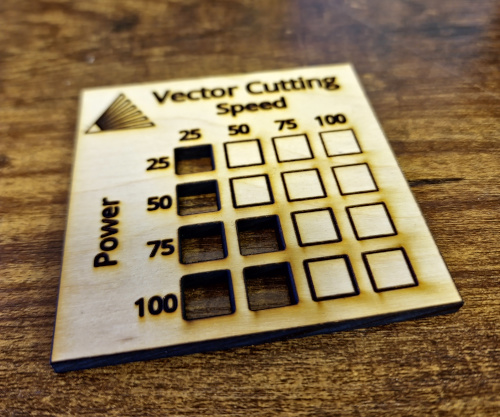
If you are using a type of wood that you have not used before, make sure you have extra so you can run the proper materials tests on it. The results of the materials test will give you a grid of different combinations of power and speed settings and is available for both engraving (raster) and cutting (vector). You can download those test files here. And don’t forget, if you don’t get it right the first time, try again. Trial and error is one of the best ways to learn about your laser and how it works.
Wood Engraving Tip #3: Keep Records
Whenever you are using a type of wood from a specific source, make sure you record your final settings that you used. There may be times that you won’t use a type of wood for months, and then come back to it and wonder what settings you used to get previous results. If you record your settings using either our materials test log or your own method, you will be able to reference those settings quickly so you can get the same results virtually everytime.
If you get the same type of wood, but from different sources, it is recommended to record your results for each source that you get it from. Even though it will be the same type of wood, there is a chance that there will be something slightly different that will give you different results.

Wood Engraving Tip #4: Stay Clean, Stay Safe
Wood will always produce smoke when it is being cut or engraved in a laser machine. CO2 lasers essentially burn the wood when they are cutting and engraving, so it is unavoidable. Because of this, you’ll get dust and residue inside your machine that will need to be cleaned. Make sure your mirrors are 100% reflective, and also make sure your lens is free of dust and debris in order to get the best possible results every time.
Because wood engraving and cutting will produce smoke, make sure the proper measures have been for ventilation so you breathe in as little smoke as possible. The smell will always be there, but you want to make sure to keep those smoke particles out of your lungs. Never leave the laser unattended while cutting or engraving, either. There is always a risk of fire, so make sure you have a functioning fire extinguisher within reach at all times, and check the air assist frequently to make sure it is working properly. Safety is often the last thing on our minds, even though it is the most important factor you should be aware of while using a laser cutter and engraver.
Full Spectrum Laser is a leader in easy to use, highly versatile laser cutting and laser engraving machines. Our systems range in size from desktop units and high-volume machines through industrial-grade production equipment. Our machines are running all over the world: from grade schools to National Labs, garage startups and many Fortune 500 companies. Contact us today to learn more.