So you’ve got a new lens for your Muse fiber laser engraver, and you need to know how to replace it? This article will give you the "how to" details and instructions for Muse Fiber Laser engraver focus and calibration.
Below is a list of items that you will need before you begin:
- Metal business cards (black ones work the best). These can be found online at retailers like Amazon.
- A ruler with millimeter measurements where the 0mm mark begins at the edge.
- A sheet of metal at least 8 square inches.
- A plain, unmarked, white piece of printer paper.
- Autofocus tag (comes with the laser)
Muse Fiber Laser Engraver Lens Replacement
Before you begin replacing the lens on your Muse fiber laser engraver, make sure it is powered off. If you’d like to unplug it for safety, that is fine. Safety is very important, and it never hurts to be too careful.
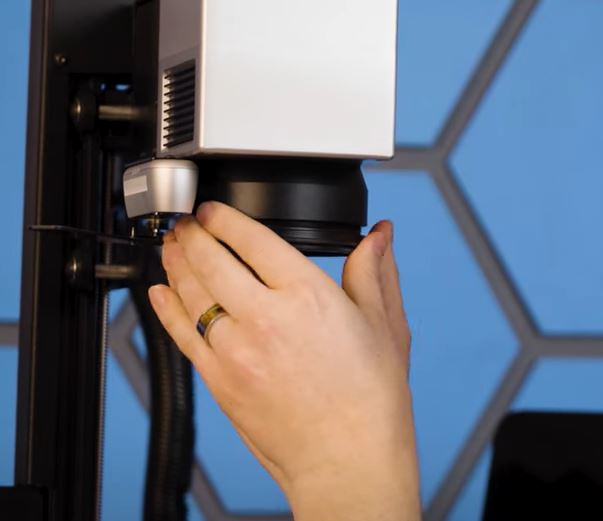
Changing the lens out is an easy process. Just unscrew the old one and screw the new one back into its place. The lens that is installed has an outer shroud that you will want to ensure stays in place, so make sure you only unscrew the outer, textured rim of the lens.
Be careful and make sure you don’t get any fingerprints on the top or the bottom of the lens, and place it into the container that the new lens came with for safe keeping. Also, make sure you don’t tighten the new lens too much, since you’ll want to be able to easily remove it in the future.
Now power up your Muse fiber laser engraver and continue to the next steps.
Muse Fiber Laser Engraver Focus
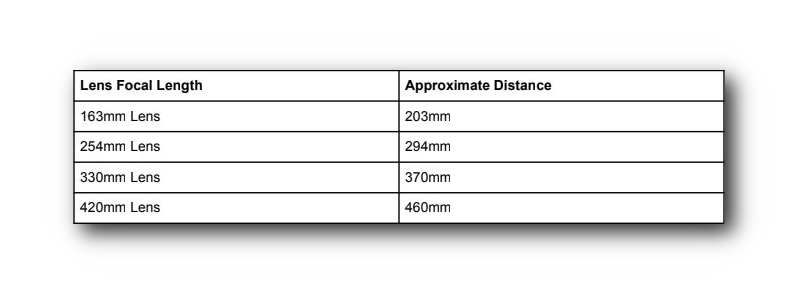
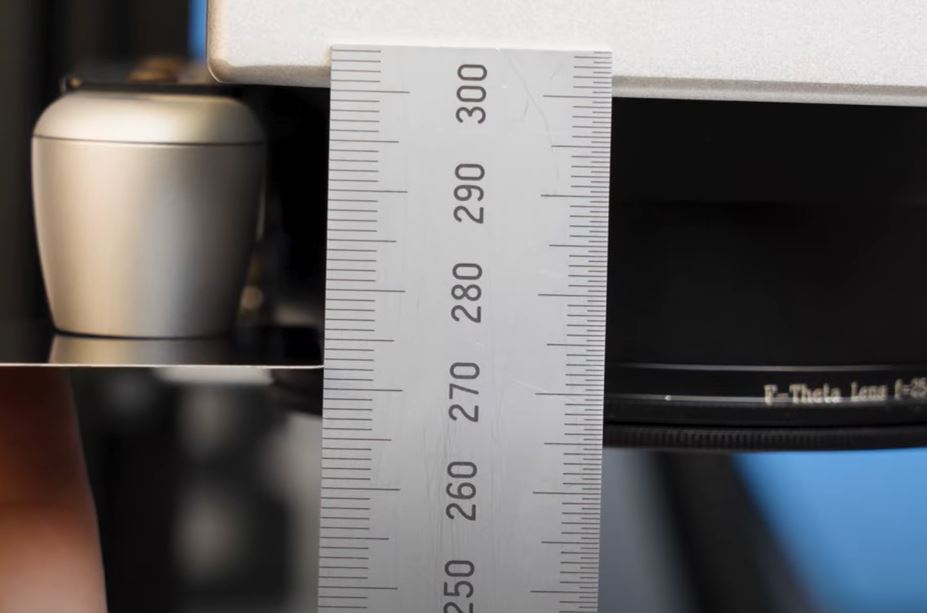
Make sure your workspace is clear of any materials or objects, then load up the RetinaEngrave v3.0 software (RE3) on your computer. Find your lens on the chart below. Using your ruler to measure, jog the laser head until it is at the measurement listed in the chart for your installed lens. You can also find the chart in your user manual.
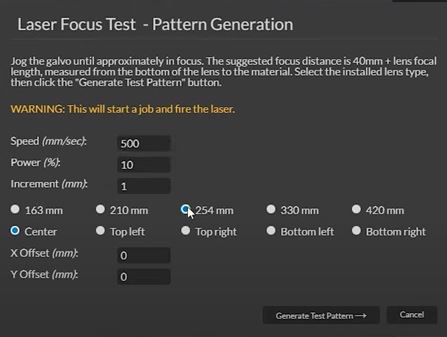
Place one of the metal business cards directly under the camera. You can use the 7” LCD display on the laser to position it properly. In RE3, select the “Laser Focus Test” settings menu (button to the left of the camera capture) and choose your lens that you just installed. Make sure the speed is set to 500 mm/second, the power is set at 10%, and the increment is 1 mm.
Take a camera capture.
Now select the “Generate Test Pattern” button and the laser head will rapidly move and engrave a grid of squares at heights. When it’s done, find the first one where it began engraving and check the correlating box in the RE3 software. You’ll notice some squares are marking the surface but not engraving. We want the first box where the edge of it is starting to turn white. Now find the last square that was engraved and check its correlating box.

Once you have those two boxes checked, click the “Focus selected results” button. The laser will now be focused properly to the lens that we just installed. Go ahead and run the test again to verify and narrow down your results
Congratulations! Your Muse fiber laser engraver is now focused.
Muse Fiber Laser Engraver Calibration
Take the piece of plain white printer paper and lay it directly under the camera. Just like with the business card, you can use the 7” LCD display on the machine to make sure it is centered.
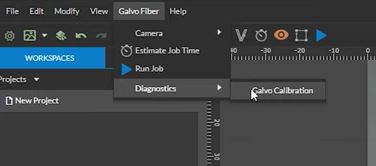
In RE3 software, select the Galvo Fiber menu at the top, then diagnostic, and then galvo calibration. This will open a new tab in your browser that is specifically for calibration. Disregard the focus test section, since that is what was completed in the previous step, and move onto the next section and click the “Run Lens Calibration” button.
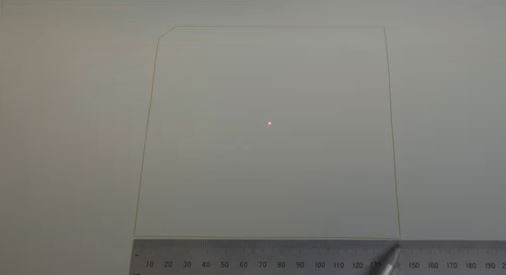
Be patient, as this next part will take several minutes. If you monitor the 7” screen on the side of your Muse, you’ll see the camera go dark to where you can only see the laser point. The red laser will begin dancing and jumping around the paper as the calibration process commences. This is just the camera calibrating itself with the laser.
When it’s finished, the camera display will go back to normal and the red dot will return to the center. In the RE3 software, you’ll now see the message that says it passed.
Autofocus Tag Programming
Your Muse fiber laser engraver will come with an autofocus tag. You will need it to complete this step.
Take the autofocus tag and place it directly under the camera. Just like before, you can use the camera display on the 7” screen to make sure it is centered under the camera.

Back in RE3 software, you will still be using the new calibration tab that opened. Find the “Tag Focus Autofocus Calibration” section and click the “take a snapshot” button. As long as nothing was changed from the previous section, the laser should still be in focus, so click on the “Save Focus” button.
Make a note of the height shown on the laser’s screen. Now, jog the laser head down until it reads 5 mm. Using your ruler, measure the distance from your workspace to the bottom of the camera. Take this measurement, add 10mm to it, then set that as your lower offset in RE3 software. Now select the “Test Autofocus” button and your laser head should jog back into focus.
Your Autofocus Tag is now calibrated.
Mark Adjustment
Let's check to make sure your red dot matches up with what actually gets engraved.
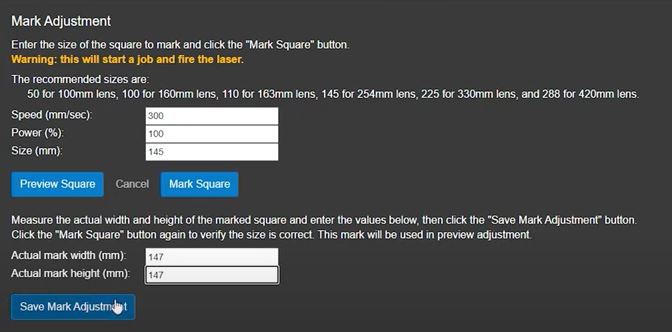
In RE3 software back in the calibration tab that we've been working in, skip the “Camera Rotation and Offset” section and move to the “Mark Adjustment” section. The final step will be adjusting the red dot to the actual laser. Find the speed and power listed in the recommended sizes on the screen, and input those in the box listed.
Now select “preview square” and place a metal sheet in the work area so the preview is completely on the sheet. Now use the “Mark Square” button to engrave it onto the material. DO NOT move the material after it engraves.
Measure the square with your ruler and see if it matches with what is listed in the calibration window. If it doesn’t match, enter the measured dimensions into the boxes below.
Save the mark adjustment, move your material, and mark the square again. Repeat the measurement process with your ruler to make sure it matches. DO NOT move the material and move to the next step.
Run the “Preview Square” to make sure the red square matches exactly with the engraved square. Use the adjustment buttons if necessary to line up your red square to the engraved square, then select “Save preview adjustment.”
Now your laser is aligned and good to go.
If anything in your software is different than what is shown in this article, please contact our support team and they will be able to help get the right software update loaded onto your machine. If you still have issues and need assistance, we are here to help. Watch our video below on Muse fiber laser engraver focus and calibration for a more detailed step by step process.
Full Spectrum Laser is a leader in laser cutting and laser engraving systems. Our systems range in size from desktop units and high-volume machines through industrial-grade production equipment. Our machines are running all over the world: from grade schools to National Labs, garage startups and many Fortune 500 companies. Contact us today to learn more.