The best laser cutting machines are designed to create an easy, fast and efficient workflow. It is easy to get confused when it comes down to power, speed and other settings that are required. This can especially happens if the operator doesn’t fully understand how those settings work together and if they are raster (engraving) or vector (cutting) settings. So let’s take a look at each one to better understand your laser cutting machine and the best settings to use for vector cutting.

This blog is the second part in a two-part series. In the previous blog post, we looked at the best settings for engraving (raster), and now we will dive in and take a closer look at the settings to use for vector cutting.
Vector Color (Tag)

In the RetinaEngrave v3.0 laser control software, tags will allow you to create separate vector layers and keep track of them by allowing you to assign them their own unique color. You can set each color so it will match an object in the work screen. Sometimes you will have projects that need to be cut out in a very specific order. Assigning these tags their own color allows you to set the order that your laser cutting machine cuts the vector lines in your project (just click on the “three dots” and then drag the layer up or down to change the order). Once you have done that, the objects can then be set to be processed from top to bottom or bottom to top, depending on how you set it up.
Setting Vector Speed
The speed settings will determine how quickly the head on the laser cutting machine will move. When you are vector cutting with your laser machine, it is generally best to keep the speed on the low side and the power on the high side (see below) in order to give the laser enough time to cut through the material. If the laser is not cutting all the way through the material, you can lower the speed.
Vector cutting uses the opposite approach to raster engraving, since you want to find the best balance/ratio of higher power and lower speed. For better results with thicker materials, you can also add extra passes (see below). Just remember that your laser cuts the material by burning through it, so if you do multiple passes, you will burn and char the edges more than with a single pass.
Setting Vector Power

The power setting will determine how much power the laser cutting machine is instructed to give the laser tube. A good way to think of it is to compare it to an internal combustion engine. Feeding more oxygen to the gas in the engine can produce higher RPM and push your vehicle harder. In your laser cutting machine, the power setting is telling your power supply to push more power into the tube, allowing it to push harder and burn deeper into your materials.
As with speed, the power will vary depending on the wattage of the laser tube that is installed in the machine and the properties of material itself. Run a materials test on any extra or scrap materials of the same type so you can figure out what is the best setting for your machine. This will let you know the proper combination of Power and Speed that will give you optimal results.
Setting Vector Current
Vector current is a setting that is unique to vector files and is not present in the raster settings. The Vector current controls the spacing between pulses of the laser (AKA frequency). Setting the current to 100% will create constant power for smooth cutting, while lowering the setting will add increasingly more off time between the laser pulses. For example, if your laser is cutting through wood just fine, but leaves a lot of char on the edges of wood where it was cut, then try lowering the current for less charring and a more amber-colored edge.
Passes
This setting allows the operator to assign how many times the laser cutting machine will complete a full cycle on the vector line that is being cut. Adding passes will create deeper cuts, but please note that this will likely increase the amount of charring and burning on the edge of the cut.
Laser Cutter Material Testing
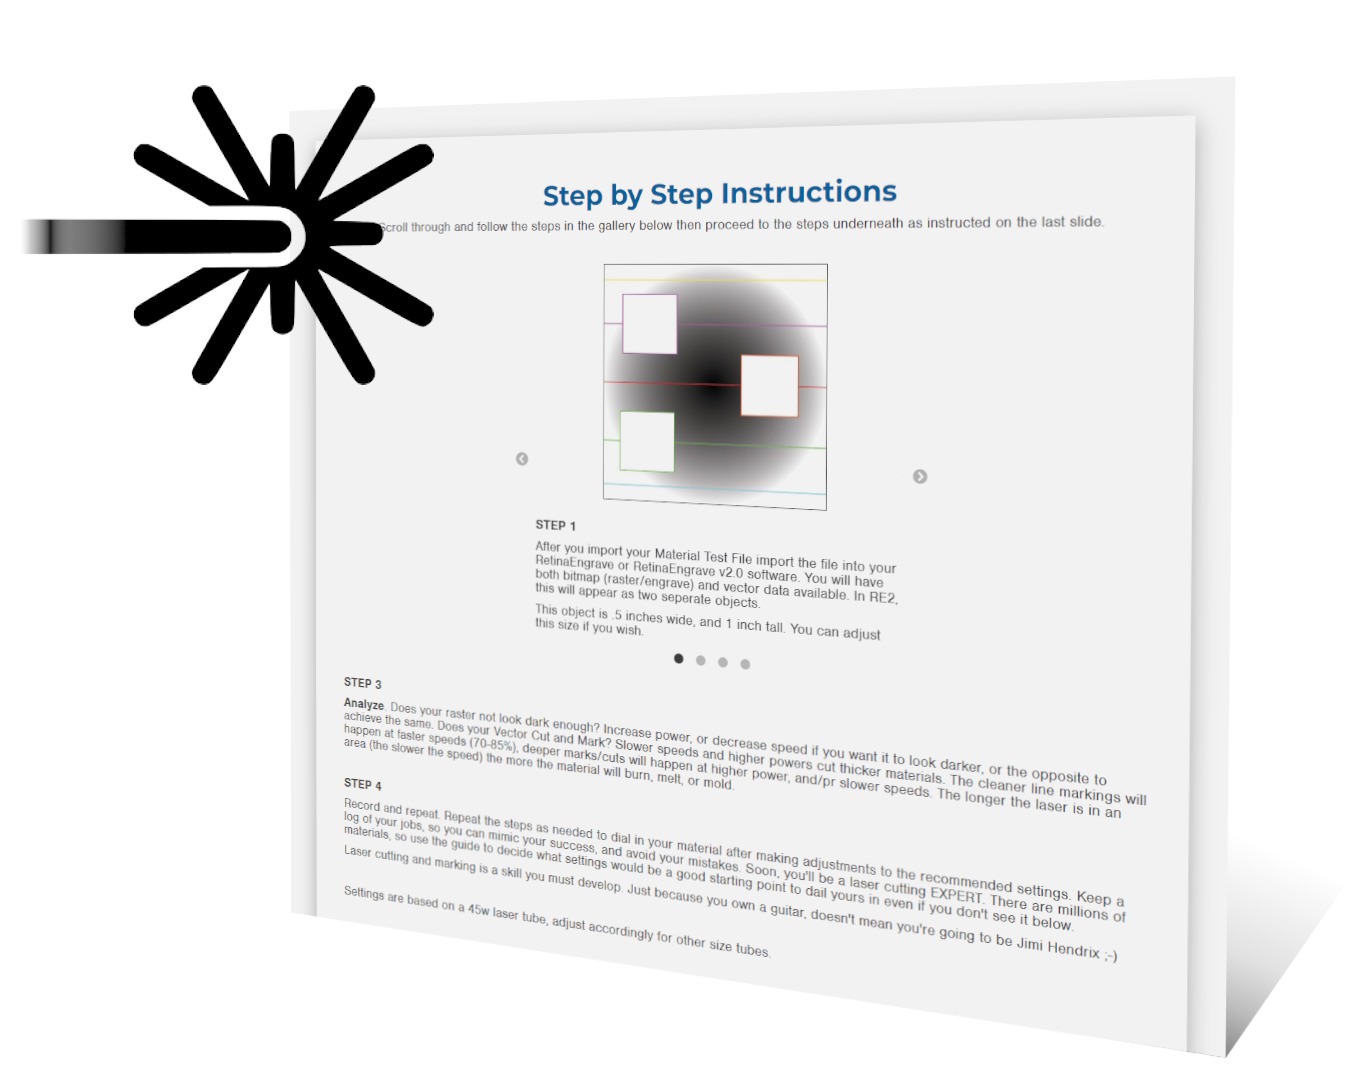
Your laser cutting machine's settings will vary across multiple variables. Things like your tube wattage, type of material, and thickness of material will determine what settings need to be used. It’s best to run a material test on a piece of spare scrap from the same batch, some extra material of the same type, or an inconspicuous portion of the material you will be working with before creating your final piece. Once you have determined the best settings, go ahead and make a log of your results to save time on future projects.
Just remember, as your laser tube wears out, you will notice that it will take more power and slower speeds to cut. If this is the case, check to make sure your mirrors are 100% reflective and that your lens and beam combiner are clean and clear of any dust or debris, then check your alignment. If you are still having the same issues after all of that, then it might be time to replace your tube.
Just remember to keep at it, and don’t stop just because you run into a road-block. These are the best opportunities to learn and grow so you can become a laser expert. If it is something you just can’t figure out, then don’t worry, because we are here to help. Just contact our team and we will help you get back to making.
Full Spectrum Laser is a leader in laser cutting and laser engraving systems. Our systems range in size from desktop units and high-volume machines through industrial-grade production equipment. Our machines are running all over the world: from grade schools to National Labs, garage startups and many Fortune 500 companies. Contact us today to learn more.