Most top quality laser engraving machines are designed to create an easy and fast workflow. For some, things can get a little confusing when it comes to power, speed and other settings that are required with a laser engraver machine. One key example of this challenge is how settings should differ depending on whether they are raster (engraving) or vector (cutting) settings.

So let’s take a look at both raster engraving and vector cutting to help you better understand the settings for your laser engraver. All of the following examples will be based around our Muse desktop laser with the 45Watt (W) Carbon Dioxide (CO2) tube, although the aspects that we will cover will also work with the larger tubes in both desktop and floor units.
This blog will be completed in two parts. First, in this blog post, we will look at settings for laser engraving and in the next blog post we will take a closer look at settings for vector cutting.
Laser Engraving Properties
Laser engraving–also known as rastering–is the process of creating a surface image on material without cutting through the material entirely (aka vector cutting). Rastering is a process similar to how printers work, where it applies “dots” to the material as it moves point to point along the x-axis, and continues line by line down the y-axis. This is where the term “dots per inch” or DPI comes from, and the more densely they are applied, the more details you will get (kind of like the higher resolution on a television screen).
This process requires setting power and speed, just like vector cutting, but also introduces DPI options (resolution) and some photo engraving options such as dithering.
Setting Your Laser Engraving Machine Properties
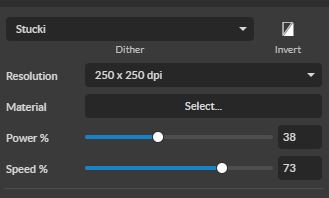
When using RetinaEngrave v3.0 laser software, clicking an object in the workspace will allow you to access that object properties tab. The software will identify if the object is a vector or an engravable object and present the appropriate properties window. Assuming your design is a engravable raster, the following settings will present themselves:
- Resolution: The resolution of your photo engravings will be determined by the DPI. DPI options include 250, 500, and 1000. The more dots per inch, the higher precision and quality of your images, while a lower DPI will process and engrave faster. Remember that with a higher DPI (1000), the laser is in contact with the material for a longer period of time and may result in deeper engravings than with a lower DPI (250). Speed and power should be compensated for different DPI settings. The software’s default resolution is set to 250 DPI.
- Power: The power settings determine the output of the laser tube installed in your laser engraving machine. A 100% power setting will create a deeper engraving while lower settings will create more surface level engravings. You may also notice that on some materials, the higher power will burn and give a different effect based on how it interacts with the material (See the material testing section below).
- Speed: Speed settings determine how quickly the laser head will move. For the fastest engravings, 100% is ideal. However, faster is not always better when engraving. Lowering the speed will allow you to create deeper engravings, as it allows the laser beam to be in contact with the material for a longer period of time.
If your selected image does not have these settings, but has vector references instead, you can either convert the image to JPEG or PNG and import it again, or you can use the “rasterize” option located just below the vector settings.
When you are dialing in your settings that you want to use for your laser engraving machine, try to find the best combination of highest speed with the lowest power. This will give you both a good quality image along with being the most efficient way to engrave in case you have to produce multiple of the same projects.
Dithering Options for a Laser Engraving Machine
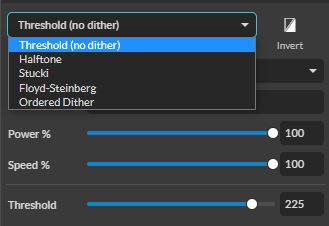
There are a variety of dithering options that will change how the laser reads the individual pixels and translates it into your engraving.
- Threshold (no dither): The laser engraving software will translate the image into either black or white pixels (black gets engraved, white doesn't). This will work for two tone engravings such as text and logos.
- Halftone: This method will produce varied levels of dark and light tones by essentially placing them in a grid of different angles so they don't always land directly on top of one another.
- Stucki: This method will produce its depth from black to white by distributing its inaccuracies to the surrounding dots producing more of a "blend" between the lights and the darks.
- Floyd-Steinberg: Uses a similar method to Stucki, but distributes its inaccuracies among even more surrounding dots, making the image even more blended. This won't be as detailed as Stucki, but will produce more blended results between the lights and darks.
- Ordered Dither: This dithering method reduces the number of colors and distributes them among a threshold map. Details will be reduced compared to the other methods, and it will appear more cartoon-like or pixelated.
Material Testing
As always, settings will vary with your tube wattage and type of material. It’s best to test on an inconspicuous part of your material, or use some scrap materials from the same batch before creating your final piece. Once optimal results are discovered for speed, power and current, through material testing, record the settings for each in a materials log. You can find detailed instructions for testing materials by following this link.
Don’t be scared to dive in and experiment. The more you engrave and familiarize yourself with the settings, the closer you will become to being a laser expert. When it comes to laser cutting machines, trial and error is the best method to learn and grow.
If you are overwhelmed, don't worry. Every expert at one point in time had to learn about the proper settings for laser engraving machines. Best of all there are a range of resources for you to take advantage of. If you have any questions, or if there’s something we didn’t cover that you’d like to know more about, head over to Laser 101. You might find that your questions was already covered in an existing video or blog post. Naturally, you can also contact us at any time. We will always be here to help.
Full Spectrum Laser is a leader in laser cutting and laser engraving systems. Our systems range in size from desktop units and high-volume machines through industrial-grade production equipment. Our machines are running all over the world: from grade schools to National Labs, garage startups and many Fortune 500 companies. Contact us today to learn more.
