
Butterfly Candle Holder
Find serenity with this beautiful butterfly candleholder. Perfect on a fireplace mantle or as the centerpiece of your next family gathering. Complete instructions allow you to recreate our design or customize your own showpiece.

- Safety First: Ensure workspace is free of fire, electrical and other safety hazards. Be aware of all safety issues when cutting materials with a laser. Always have a fire extinguisher on hand
- Power on the laser and all of its components.
- Ensure that:
- The laser is powered and the boot up cycle begins on the screen.
- The cooling system is connected properly and water is flowing through the tube.
- The air compressor is powered and exhausting air to the laser head.
- The exhaust system is on and vented into a safe location. - Connect to RetinaEngrave 2.0 software using your machine’s touch screen to copy the software IP address into your favorite browser. The Wired IP address is displayed at the bottom of your touch screen.
- Import your design and adjust power and speed settings. Double check settings including the number of passes and cut order.
- Insert material into the laser bed. Use the focus tool to adjust to the top of the material. Focusing should be done each time a new material is introduced.
- Use the “Perimeter” function to ensure that the file will fit within the cutting area. Adjust accordingly.
- Run the job file. Do not leave a job running unattended.
MASKING
Before cutting, paint your wood the desired color. This will be the main color of the butterfly. When dry, add a layer masking tape over the painted wood.![]() |
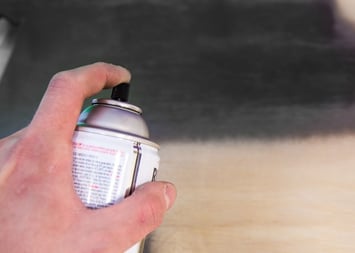
![]() |
CUT
Import the included designs as vector only, and cut out all the pieces. Cut the Frame file from wood making sure to mark all blue vectors, and completely cut all red vectors. Cut the Fabric file out of your decoritive fabric.You should have 4 Wood butterfly frames, A circular base, 2 semi circles, and 4 Fabric liners.
PAINTING
Peel the tape from the marked circles to expose small sections of the wood. This allows the remaining tape to act as a stencil protecting the main color.
Once all the accent marks are exposed, add a colored layer of paint
When this finishes drying, remove the masking tape to expose the 2 color design.
ASSEMBLE
Add glue to the back of the butterfly frame, and attach the fabric piece making sure that the decorative side is facing outwards.
Continue with the remaining 3 panels.
Add glue to the two semi circle sections, and attach this to the marked sections on the base. Also shown in next slide..
Attach 3 of the butterfly panels by inserting them into the slots.
Position the completed base assembly into the notches.
Well Done!

