
Laser Cutter Support: FAQ
While using your laser cutter and engraver, you will most likely encounter situations or challenges that you may need to know the answer for, so you turn to online research or aid from a support technician. Many times, your question can be answered through a video or document that won’t require you to contact support or open a support ticket.
In this article, I will list several of our most frequently asked questions along with the answers for them. If you have questions that are not answered in this article and you have a Full Spectrum Laser machine, feel free to visit our support page to solve the issue.
Laser Cutter Support: How do I check Mirror Alignment?
If you're not getting marks from your laser, if lines are crooked or cut off you may need to align your mirrors. Before going through those steps though, it's always better to do a short test first.
Tools needed: Thermal Paper
You'll want to secure a piece of your thermal paper to the end of the nozzle. Firmly press against the tip to get an impression of the nozzle for better visualization.
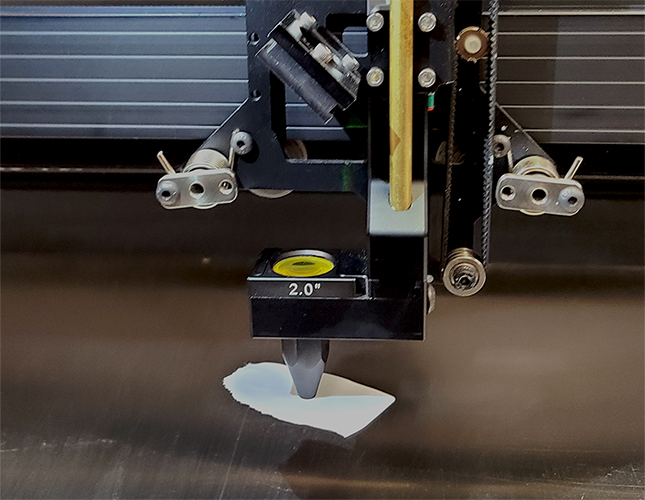
The thermal paper used in the example was the kind for shipping labels, so it didn't require anything to stick it to the nozzle. Once you have your paper secured, close your lid and test fire.
Remove the paper and examine it. How close to the center of the nozzle is your test fire hitting?
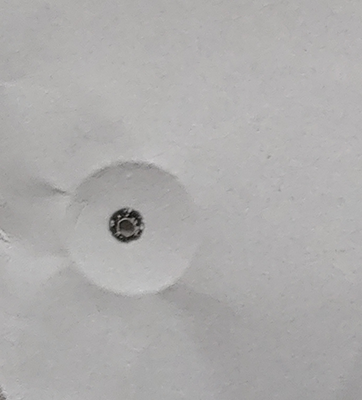
As you can see in the picture above, this is almost perfectly in the center of the nozzle impression. If your laser looks close to this you should be able to run with no issue.
If you don't get a mark after test firing, or if the mark is clipping the sides or otherwise off-center you'll want to do mirror alignment.
To do any adjustments on your laser's mirrors please refer to their Alignment Guides:
Laser Cutter Support: How do I replace the Tube on my Muse Core/3D?
If you find yourself needing to replace the laser tube in your Muse series machine this guide can help you.
Make sure to read or watch all instructions before proceeding.
Tools Needed: 2.5mm Hex Key
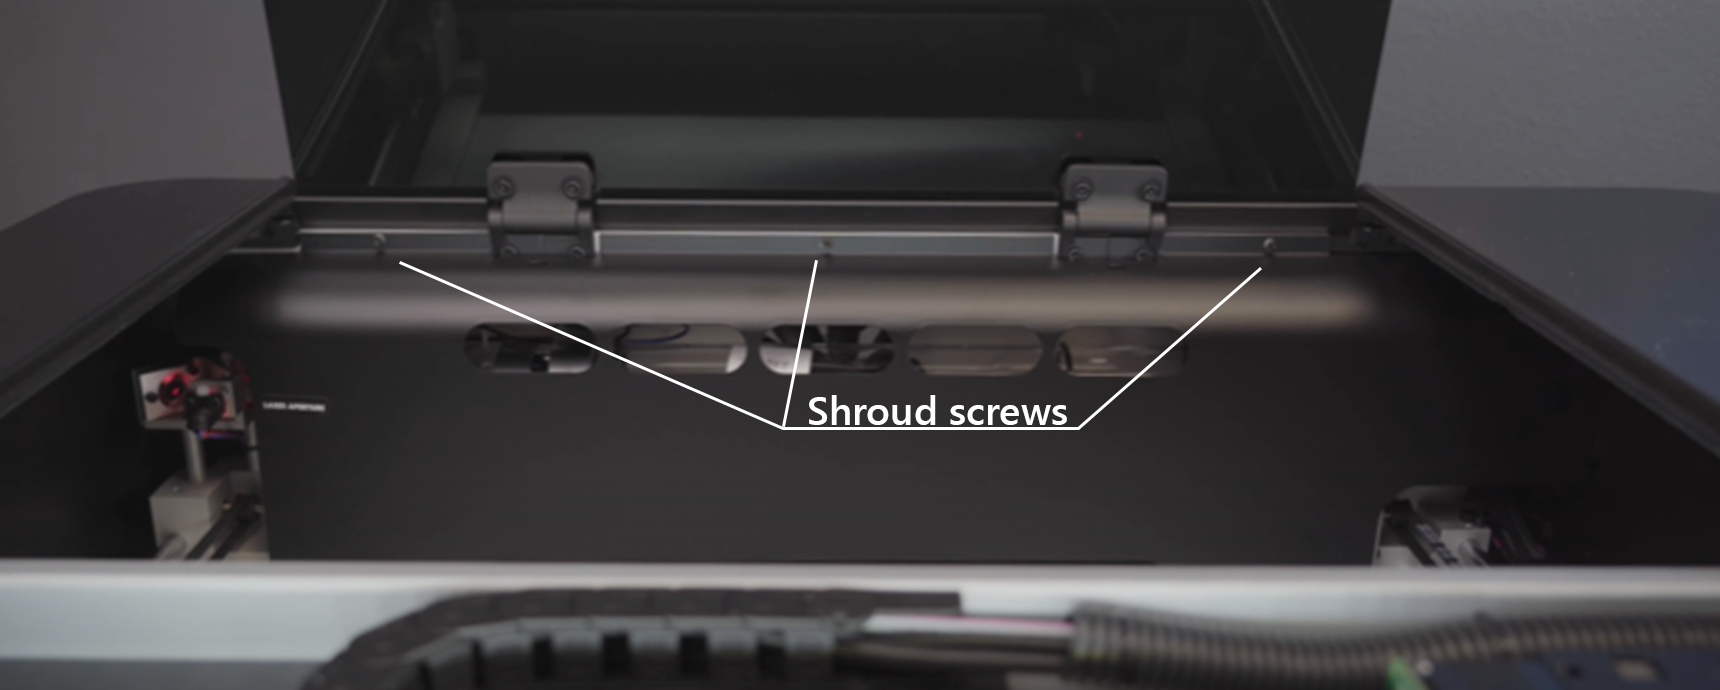
Clear inner workspace, remove Honeycomb Tray(s), and move unlocked laser head gantry to the front of the machine. Using the 2.5mm hex key, unscrew the 3 screws at the top of the shroud. Make sure to keep screws safe for reinstallation later.
Lean shroud forward, slightly angle it, and pull up to remove it from the workspace. Set aside for reinstallation later. The laser tube will now be exposed. Connecting to the now visible left side, will be the silicone water tube. Gently tug or wiggle the tube from the glass. Do not force if it is stuck, as it may cause glass to break. You can trim the tube directly below the glass outlet if stuck.
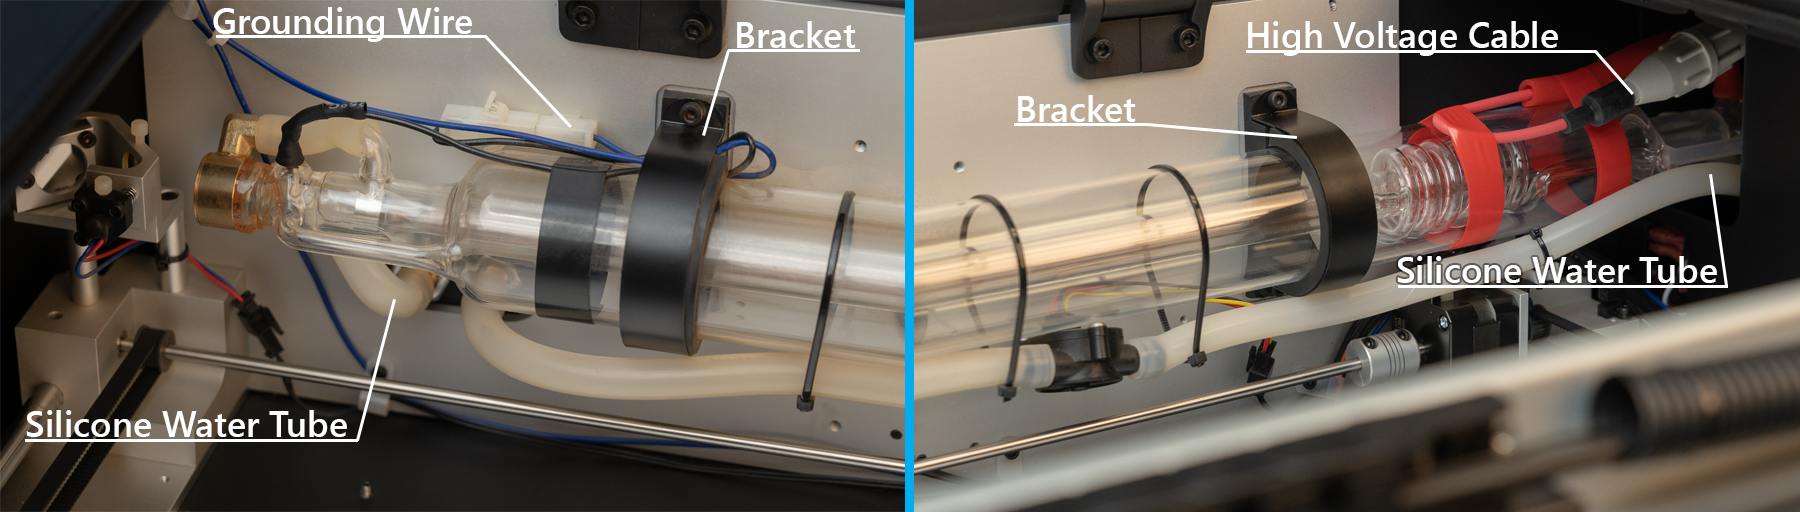
On the tube, there are two brackets holding it in place, use the hex key to unscrew the top screw holding it in place. Bend brackets forward to release the tube. Gently pull out the fragile glass tube, angling it to free it from the enclosure. Do not pull it far, set the tube atop the unit to access connections on the right side. Disconnect the silicone water inlet tube on the right, the same way you did on the left. On the right side of the tube there will be silicone tape holding down a thick wire with a large white connection. From the white cap we want to unscrew the High Voltage Cable. Now accessible on the left side of the tube, disconnect the smaller grounding wire from its white cap as well. The laser tube will now be free and you can set it aside to install the new tube.
Now just follow the steps in reverse to install the new tube.
BEFORE REINSTALLING SHROUD- Run the laser tube's water chilling system through for at least 1 minute to ensure there are no air bubbles. Air bubbles can cause hot spots and damage to, or even break your tube. Watch for those bigger than a pea and near either end of the tube. Once smooth flowing water is ensured you can reinstall the shroud.
Now your new laser tube should be installed and ready to go! Run alignment as needed to adjust focus before starting new projects.
Laser Cutter Support: How do I remove the floor panel on my Muse Core/3D?
If you need to use the riser, the rotary, or even just want to experiment more with what you can cut, this guide will help you remove the floor panel to expand your reach. Make sure you have a sturdy, clean, and clear workspace that can hold the weight of the laser system.
Tools needed: 2.5mm Hex Key
Disconnect the wires and tubing from the rear of the system. Using the end cap provided during shipping- connect the inlet and outlet on the back of the machine to prevent leakage. Remove the Honeycomb Tray(s) from the workspace area and set it aside. Move the gantry to the front of the workspace then close the lid.
Now you can either put the laser system on its side or flip it over for easier access, just make sure it is balanced evenly and in no danger of falling over. We recommend to get help with lifting and moving the machine since it can be a little large and heavy for one person to handle alone.
Once you can get to the bottom panel of the machine simply use your 2.5mm hex key to unscrew that removable panel only. Set aside the screws in a secure area in case they're needed for reinstallation later. When screws are removed the panel should slide off and you can set that aside as well. Now you can flip the machine so the legs are again below it.
In this configuration, you can use your Muse Series laser system in combination with our riser, rotary, or any other project bigger than the workspace. Make sure to remove the silicone end cap from the inlet/outlet. Reconnect all wires, tubing, and let the water run for at least 1 minute before starting to ensure there are no air bubbles.
These are just the answers to a few of our more frequently asked questions. If you have any other questions, feel free to check out this page, or contact our support team at any time for further assistance.
Full Spectrum Laser is a leader in easy to use, highly versatile laser cutting and laser engraving machines. Our systems range in size from desktop units and high-volume machines through industrial-grade production equipment. Our machines are running all over the world: from grade schools to National Labs, garage startups and many Fortune 500 companies. Contact us today to learn more.